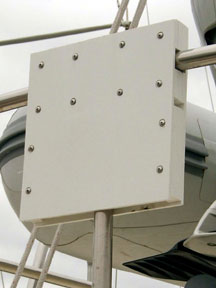
 Outboard
Motor Mount for 1.25 Inch Rails Outboard
Motor Mount for 1.25 Inch Rails
It's fairly simple to build your own
outboard motor mount for about $35. You can purchase 3/8"
"Starboard" plastic at West Marine. Cut two
pieces approximately 1' x 1' and mark a "T"
on one piece with 1-1/4" sections to represent where
the stanchion and rail will go. Top of the T should be
2" below the top of the Starboard. Place the pieces
together and thru drill about 3/16" holes (for #8
machine screws) on 3 sides about 1" in from the edges.
Also drill two holes on each side of the leg of the T
about 1" below the T.
 Use
the remainder of the Starboard to cut pieces 2" wide.
You'll have to cut three pieces for each location because
you will be building 1-1/4" spacers. Three stacked
pieces will go across the top, full length. Two stacks
of three will be horizontal under the separate arms of
the T, two vertical stacks of 3 pieces along either side
of the T all the way to the bottom of the Starboard and
two stacks of three identical pieces for the outside edges.
The bottom can be left open. Use
the remainder of the Starboard to cut pieces 2" wide.
You'll have to cut three pieces for each location because
you will be building 1-1/4" spacers. Three stacked
pieces will go across the top, full length. Two stacks
of three will be horizontal under the separate arms of
the T, two vertical stacks of 3 pieces along either side
of the T all the way to the bottom of the Starboard and
two stacks of three identical pieces for the outside edges.
The bottom can be left open.
Use double stick tape to assemble it
all into one piece of 1' square starboard, place the other
1' square piece on top and then thru drill the individual
pieces using previously drilled holes as template. It
may help to enlarge the holes in the interior pieces so
they can move around a bit to facilitate final assembly.
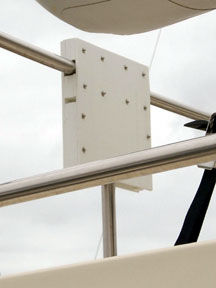
Finished product can then be assembled on your boat deck
rail over an upright stanchion, typically on starboard
side of the boat deck, just behind where the dinghy will
be secured. Use #6 or #8 stainless machine screws and
nuts with finish washers both sides, again all available
at West Marine. Outboard will hang outside the rail so
length of the shaft is unimportant. All of the weight
will be on the rail and stanchion so the screws just hold
the parts together.
Jim Moore
RILEY 37-085
|

